
Unit 3
Application Software
3.1Unit Overview
- In Grade 9 you learned the basics of word processing and spreadsheets.
- This unit moves to advanced topics.
- In the word processor: creating and formatting tables, inserting pictures, clip art and shapes, and formatting page numbers.
- In the spreadsheet: formulas, functions, working with data, charts and cell formatting.
- In PowerPoint: animation, transitions and the slide master.
- The textbook's figures in this unit are pictures of the Word, Excel and PowerPoint windows.
- Here each procedure is a practice box instead: do the steps on a computer and tick them off as you go.
🎯 Learning Outcomes
- Create and format tables in a word processor.
- Insert pictures, screenshots, clip art, shapes and page numbers.
- Use formulas and functions in a spreadsheet.
- Freeze, split, sort and filter data and create charts.
- Format cells.
- Use animation and transitions.
- Create a slide master.
3.2 Word Processing
- Word processing is the act of using a computer to create, edit, save and print documents.
- It needs specialized software known as a word processor.
- Microsoft Word is one example, and it is the one used in this unit.
3.2.1Creating a Table
- A table is an arrangement of data made up of horizontal rows and vertical columns.
- Cells are the rectangles formed where rows and columns intersect.
- Tables organize and present information, align numbers and create interesting page layouts.
- Calendars, invoices and contact lists are everyday examples.
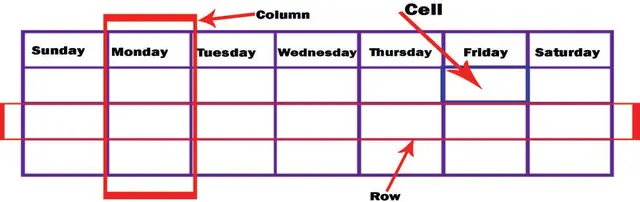
Word provides four ways of creating a table: dragging, the Insert Table dialog box, the table drawing tools and Quick Tables.
🧭PracticeInsert a table by dragging
- 1Table buttonOn the Insert tab, in the Tables group, click the Table button. The Insert Table menu appears.
- 2DragPoint to the cell in the fifth column, second row. The menu title reads 5x2 Table. Click to create the table.
- 3Blank linesClick below the table and press Enter twice. Separate tables with a blank line so that they do not join.
- 4SaveSave the document as Table 1.
0 of 4 done
🧭PracticeUse the Insert Table dialog box
- 1MenuOn the Insert tab, click the Table button and select Insert Table below the grid. The dialog box appears.
- 2ColumnsSet Number of columns to 9.
- 3RowsSet Number of rows to 3. You can click the spin arrows or type the numbers.
- 4OKClick OK. A table with 9 columns and 3 rows is inserted.
- 5SavePress Enter twice below the table and save the document as Table 2.
0 of 5 done
🔒
The rest of Unit 3 is in the Danulearn app
Read the full notes for all 3 sections, worked examples and figures, plus 5 exercises with step-by-step solutions, the Short Note and the unit review.
📑 Contents
- 3.2Word ProcessingPreview
- 3.3Spreadsheet🔒
- 3.4PowerPoint Presentation🔒